
I recently bought an old and (ab)used tube screamer that was making annoying buzzing, crackling and popping noises when turned on, and I thought the fix(es), as well as my debugging approach might be useful to other owners…
First, yes I know pedals like these high gain overdrives are inclined to pick up mains hum, especially at higher settings and higher amp settings – that isn’t something we are looking to fix here – that might be the job of a noise gate pedal – it’s the annoying pops, buzzes and crackles from bad connections. And since I just said crackles, I will touch on cleaning up pots as well…
Debug
To debug this, or any other pedal issue, you have to simplify and isolate – build on known good stuff. Since I’m an engineer, I think of building like layers of an onion, or working forward or backward, depending on how complex your effects setup / rig is – let me explain…
Working forward. If you have a fairly simple setup with a handful of pedals, it might be easier to start from the simplest setup – guitar – cable – amp, and confirm these all work fine first. Then, swap out all the cables you are using and again confirm these are all OK – now you know the basics and all interconnects are good. If there is an issue, it’s not in the effect, it’s a bad jack solder connection, or grunge on the jack itself.
Working backward. Suitable if you have the mother of all loaded pedal boards and suddenly have an issue. This is a slightly different problem beast, but again start with the basics, check cables in / out of the board, and then test each pedal individually – ideally removing other connectors. A cable tester can be useful here – pull each cable and check.
Useful tip – clean stuff! I had a friend back in the UK whose idea of bike maintenance was to ride his bike, store it in a damp shed until the next ride, and then douse the rusty monstrosity with WD40 until it worked again! Back to guitars and effects (!) – waiting til something breaks is one approach we can all relate to, but some minimal maintenance of cables and connectors can really avoid a shitty gig experience… I can recommend Dioxit G – but you can likely get decent results using good old Isopropyl Alcohol. Not WD40. (I just know someone will tell me they do!!)
OK, so we’ve got a good guitar to amp connection, and a bunch of clean / solid patch cables…
Now we add one pedal in at a time and test at low and (carefully) high amp levels. If the option exists, use a battery – so we aren’t introducing two variables. However, if you normally use a power supply, add that next – one pedal and one PSU connection. I am assuming the PSU is a decent brand with isolated outputs. If not, there can be all sorts of loops and issues… Another article maybe?
I would test each pedal individually – it’s the fastest way to find most issues. We are looking to isolate the one thing.
Gently wiggle the jacks on each side of the pedal if it doesn’t show up immediately. Once you find the offending pedal, we can get to work. But! Since you are already doing this, test the rest of your kit just in case…
Open the bad pedal and have a look inside. Trace the jacks and wiring on them. It’s unlikely you will see anything wrong, but just maybe there’s an identifiable wire barely touching, or very definite dry solder joint etc.
More likely one or more of the solder joints will have gone bad, and you can’t see it, at least not usually without a microscope.
One other test – with the bad pedal on its back, with its legs in the air (!?) try loosening the jacks (if they are case mounted) and do more wiggling. Do this carefully at lower amp volumes – this might identify the bad joint.
If PCB mounted, we need to move to re-solder the jacks, even if the connections look good. You can either desolder the jack terminals one at a time and re-solder, or use a liquid flux and re-solder over the old soldered connection – especially if you have panel mounted jacks. Since you are committed to do this, do ALL connector joints, not just the ones you suspect.
These dry joints are a common problem – they can develop over time from a badly soldered joint, and / or joints can fail due to mechanical stresses on them. For DIYers, who, let’s be honest, buy many parts from low-cost sources, I have another warning or bit of advice. Be aware that jacks you purchase may simply not be properly solderable. Be aware that cheap / fake / corroded new jacks may give you these symptoms in a brand new build on your bench – and can be soul destroying, especially after completing all that elegant looking wiring! If you get this issue, replace the connectors with known quality parts / good sources, OR just flux-solder-flux-solder until you cure it – at least for now!
I have used ultrasonic cleaners to clean corrosion from old connectors, but it was for a repair – but can be a useful trick. I spent years in the maker community for Arm, and I have seen far too many fake and nasty parts ruin a build. Being aware, you can debug if an issue arises!
Scratchy / noisy pots
Whilst I’m on the topic of noise issues, let’s look at scratchy pots. Noisy pots are ones that can crackle when moved – or not. It indicates there’s dust and grime on the track breaking the wiper connection.
99% of the time (a statistic with no backup!), it can be fixed with a generous application of Deoxit F (F for fader) or similar. Find an access to the pot internals, and spray, and rotate the wiper to apply the cleaner.
If you have an open pedal to fix a bad connector, I’d do this as matter of course anyway.
If several applications of the cleaner don’t fix the crackle, it may be new pot time.
Bypass switching noise
Now I’m going off on one, as this next topic isn’t a repair as such, but you may find this issue as you add a new pedal to your setup, or change the positions, and mix buffered / non-buffered pedals for instance. That is pedal pops when turned on (most likely) or off.
This is a mod, rather than a maintenance or repair, but again, you can diagnose and fix this one fairly quickly and cheaply.
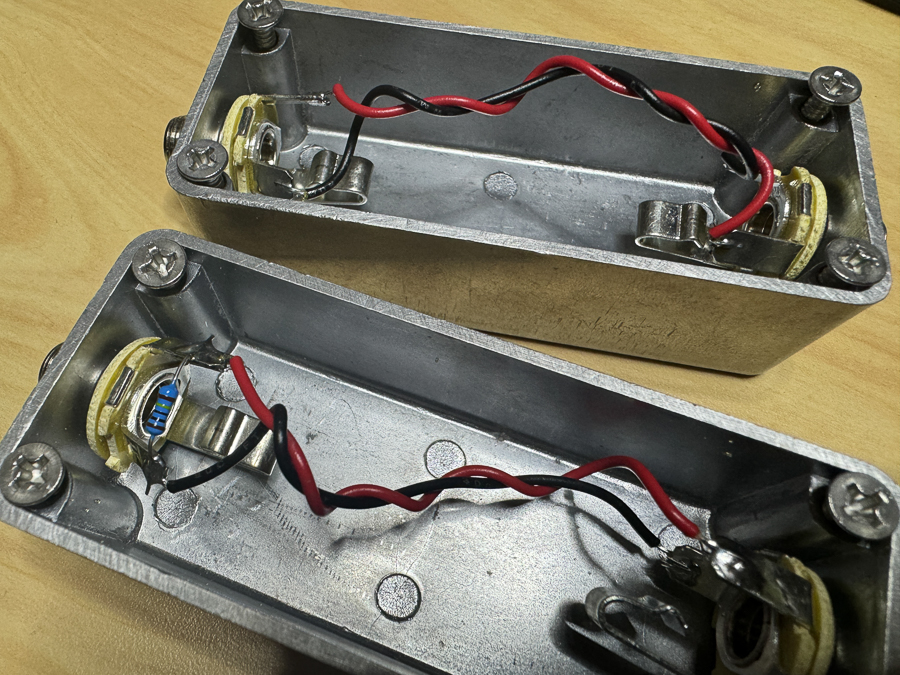
Typically the pop comes from having an input capacitor in the input circuit that can hold a small DC charge (maybe leaky, lower cost part also) and exhibits itself as a click when switched into the audio path. Typical remedy is to add a 1M resistor on the input. This gives the cap a route to discharge. To test this, try placing a resistor on the input jack – or even in the input jack plug outside the pedal. Below are some test boxes I made to access signals, and I added a 1M resistor on one of these for future testing.
Hope that was useful – an impromptu blog post caused by a noisy pedal, and I got into rant mode! Let me know if there are other topics I can usefully rant about.